The Fortifications (South)
The majority of the fortifications around the town of Portsmouth were demolished around 1880 but the southern section was left largely intact. Though modified in later generations the works retain sufficient identity to allow a fairly accurate reconstruction. This part of the research relates to the area between King's Bastion and 10 Gun Battery.
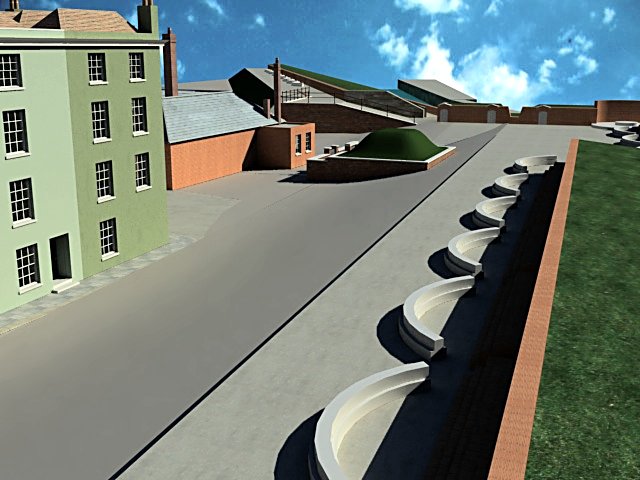
10 Gun Battery and Saluting Platform
The earliest section of the fortifications to the east of the Square Tower was the Saluting Platform, re-built in stone c1568. The Saluting Battery, also known as 10 Gun Battery was a later addition added around 1670. The map below was surveyed in 1861 and printed in 1867; it shows both the battery and the platform.
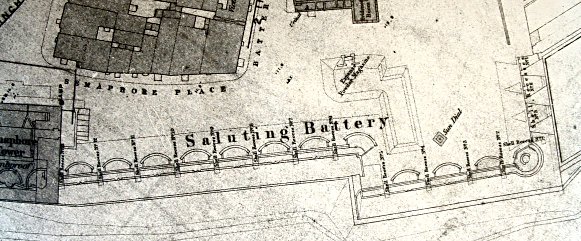
When interpreting this map and in all subsequent discussion of the Saluting Battery it should be noted that this term appears to cover the whole of the defences between the Square Tower and King's Bastion. This can be seen in a report, of an accident involving one of the guns firing the sunset salute, in the Hampshire Telegraph on 17th June 1874. The item repeats on several occasions that the gun was fired from the Saluting Battery but it also gives a more precise location for the gun in question as being "one of eight saluting guns, fixed on a platform near the place known as the Queen's Bastion opposite the Spur Redoubt". This would place it on or near King's Bastion. For this reason we shall refer to the part of the Saluting Battery under examination as 10 Gun Battery which is less ambiguous, though still slightly confusing as the map shows only 8 gun positions.
We know from several sources such as Portsmouth Paper No.3 "Palmerston's Folly" by Professor AT Patterson that the period between 1850 and 1870 was one of considerable change to the defences around Portsmouth. This was occasioned by the perceived threat of invasion by French forces under their new Emperor Napolean III together with the appreciation that recent advances in weaponry had rendered the existing defences largely redundant. Although most of the activity concerned the ring of forts around Portsmouth, the innermost line of defence were also strengthened at that time.
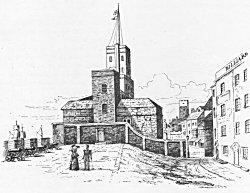
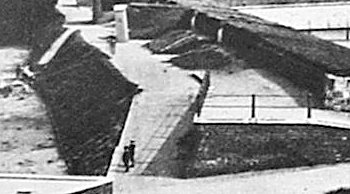
We can see from the drawing on the right made around 1800 that the Battery promenade was situated a few feet above street level with the ground behind sloping down to meet Semaphore Place/Battery Row. The equivalent difference in height today is closer to ten feet but we know that in the 1860s 10 Gun Battery had been increased in height to match that of the Saluting Platform (Arthur Corney, "Fortifications in Old Portsmouth", p20) and that it was raised yet again towards the end of the century. It would appear that at the same time the height was being raised for the first time a new staircase was introduced close to the Square Tower (see map, above) but there is a problem with this. A close examination of the map shows the staircase to have been drawn rather carelessly, (there are only six steps and these are of varying depths) leading to a deduction that it was added by hand at some date after the map was published. Further, there is no back wall to the battery which one might assume prudent to build if the battery then stood some distance above ground level.
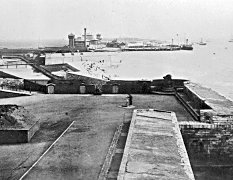
Further evidence is available in the cropped photograph on the left, one of very few from this period to show this part of the fortifications. We know that this image dates from before 1883 as the structure on the left is a magazine which was demolished in that year along with the Guard House, which is present in the full image. We also know that it wasn't taken between 1863 and 1877 as, if it were, then the memorial to the 8th (King's) Regiment would be visible beyond the Guard House. This leaves two options for the date, either before 1863 or between 1877 and 1883. A comparison between the photograph and the 1861 map is helpful in this matter. The map gives very specific details of the gun emplacements, most notably the curved arcs of the gun racers which do not appear in the photograph. It is unlikely that the photograph was taken before the racers were installed as the whole scene looks far too peaceful to come from a time of widespread fear of invasion. By 1880 however the threat of invasion had vanished and the defences were being scaled back in preparation for general demolition; this date is therefore the more likely for the date of exposure of the photograph.
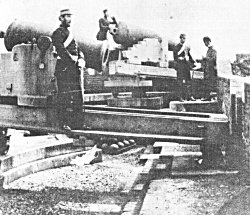
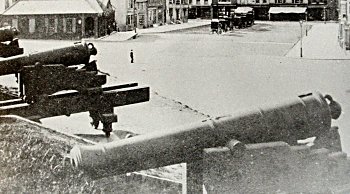
A fascinating photograph (see right) shows the armaments in place on the south-eastern corner of the Saluting Platform in 1870. The gun racers, firing steps and embrasures are all clearly visible. Their positions are as depicted in the 1861 map so we can be fairly confident that a similar system would have been deployed on 10 Gun Battery from at least 1861.
Combining all of this evidence we can be certain that the back wall of the 10 Gun Battery, and probably the staircase as well, were not present in 1860. We now only need to establish the probable elevation of the battery walkway and the dimensions of the parapet, and for this we can look at the report of archaeological work done on the 10 Gun Battery in the 1980s.
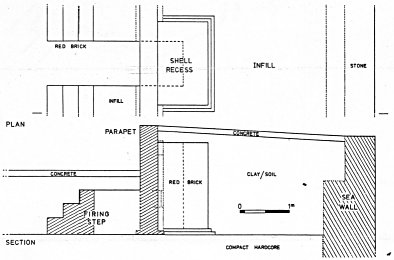
The archaeologists cut a series of trenches across the whole battery and were able to determine with some precision the exact heights of the parapet and firing steps in relation to the top of the promenade. They also showed the structure of the shell recesses, which although noted on the 1861 map are not clearly defined. In addition, the excavation showed that there was considerable use of red brick on the firing steps and in the shell recesses. This nicely matches the brick construction of the parapet that can be seen in the 1870 photograph. One aspect of the defences that was not addressed by the excavation was the issue of embrasures. The 1870 photograph clearly shows one such, before the nearer gun, but that is on the older Saluting Platform and not on the upgraded 10 Gun Battery which, from around 1860, had a parapet nearly 12 feet thick. Some drawings from the period show guns positioned to fire over a parapet rather than through embrasures and it is assumed that this was the case on 10 Gun Battery after 1860.
The drawing of the cross-section through the battery is helpful in one other respect, namely the difference in height of the promenade between 1860 and the modern day. This turns out to be about four feet. Bearing this in mind we turn our attention once again to the rear wall of the battery as it exists today and note that the top of the existing stairway adjacent to the Square Tower is exactly level with today's promenade surface and all the surrounding stonework is consistent with it having been so since construction. This implies that the staircase we see today was built at the same time the battery promenade was receiving it's final elevation and therefore can have little connection with any stairway that may have been present in 1860.
Having now examined the evidence concerning the 10 Gun Battery we can use it to extend the model to the Saluting Platform, which though constructed somewhat earlier than the battery had, in 1860, much the same structure. The one difference between the Battery and the Platform seems to have been that the latter may have retained it's embrasures until perhaps 1870, but the 1861 map does not show them. The map does however indicate features that could be embrasures on the eastern flank of the Saluting Platform, but these are not accompanied by racers or firing steps.
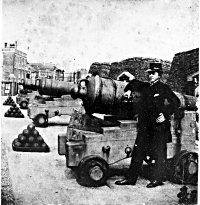
The 1880 photograph, above, suggests that there may have been one gun firing through an embrasure situated about half way along the wall, but the gun looks to be of a rather older design. An earlier photograph (see right) shows three guns on Garrison Carriages and the prominent embrasures in the eastern flank wall which is somewhat higher than in the 1880 photo. That photo also shows the presence of three apertures in the brick wall, two of which exist today. They would presumably have been ammunition stores. These need not be modelled in detail as there are doors that prevent visual access on all of them. Evidence for the doors exists today in the form of centre bolt holes in the surrounding masonry.
The ground level immediately behind the platform and battery is level as one might expect, but further towards Grand Parade and Semaphore Place the ground falls away quite significantly in the central area whilst there is a more gentle slope adjacent to the eastern wall of the Platform. The latter can be seen to integrate with a reverse slope which leads onto the ramparts of Long Curtain. Between that and the eastern wall there is a narrow access point onto a walkway (Chemin-Des-Rondes) which allowed sentries to circumnavigate the town above the escarp but below the top of the rampart. There are no clear images of this walkway around 1860 but there exist plans of the fortifications which indicate that they have not altered between their construction and today.
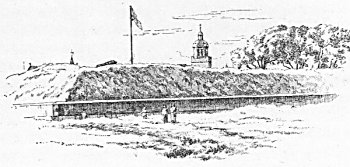
It is perhaps surprising that the whole of the Long Curtain that faces the sea on the inside of the moat has remained much as it was when the rest of the fortifications were demolished. This is illustrated by the two drawings below which were made in the late 19th century, though it can be seen that the top of the rampart was a lot more irregular than it is today.

The major changes to the fortifications since those images were created were the installation of the public walkway across the Spur Redoubt and the various alterations to the profile of the ramparts on the landward side. Indeed the latter seem to have been made many times, not the least being during the two world wars. Even so they are not so drastic as to hide the 1860 shape of the structure altogether. What remains problematic are the cross-sectional dimensions of the gun platform. We can see from the 1880 photograph (see detail below, left) that there is a wide strip along the rear of the rampart, whereas a photograph probably taken before 1860 (below, right) shows a far narrower ledge, capable of accommodating a medium sized gun but not much more. Also, the height of the parapet seems to be much higher above the platform in the later image.
Useful though each of these images may be, neither shows the configuration of the ramparts during the intervening period which is shown on the 1861 map. Fortunately the map is clear enough to deduce that the wider platform was in use immediately after the fortification upgrading that took place in the 1860s. Although we do not know whether this change had taken place by 1860, the model will be constructed as if it had been. This means that the same gun emplacements we saw on 10 Gun Battery will also be present on the ramparts. In this case though, there are three sets of three guns each and between the sets are structures that we assume to be shell recesses despite the fact that they are much larger than those on the battery. As we do not have sufficient evidence these will be constructed at a later date.
The last issue to consider in respect of the gun emplacements is whether the guns fired through embrasures or over the parapet. The 1861 map gives a strong indication that embrasures were present but we can see from the photo, c1860, above, that the gun would be easily capable of firing over the parapet, if that is what is showing in the lower left of the photograph. Of course this may not be relevant if the photo was taken before the modifications to the gun platform were implemented since the 1880 photo shows us that the difference in height between the platform and the parapet top was then much greater.
King's Bastion
Although the general outline of King's Bastion remained virtually unaltered up to the time the rest of the fortifications were demolished, the internal structure is surprisingly complex given the simple edifice we see today. The bastion was a crucial part of the defence of Portsmouth as it would have supported the first guns to engage an enemy should there be an attempt to enter the harbour - assuming any ship had passed Southsea Castle without serious damage. So, not only would it have held a formidable arsenal at the disposal of the commander, within the bastion itself was a vast magazine.

Given it's prominence we might have expected more images of the defences, but the only photographs date from around 1880 and even then they do not contain very much detail. Thus we are left with two important paintings by RHC Ubsdell and of course the 1861 OS map (see right). Ubsdell is well known as an artist and photographer and was probably the first person in Portsmouth to seize on the possibilities of stereoscopic images. That such images were taken of Portsmouth is confirmed by an advertising flyer issued from the Ubsdell's shop at 135 High Street, but the King's Bastion is not specifically named. Some of the images are known to have survived but none is currently available.
Of the two paintings by Ubsdell that feature King's Bastion, one is a somewhat stylised picture on top of the bastion, featuring the flagstaff that stood there for very many years (the version we have available is from the London Illustrated News). The other is a large panoramic view of Governor's Green which includes the bastion in great detail. Immediately obvious is an important change to the facade of the magazine which today contains four rounded arched doorways in a single, inclined, brick wall, but in 1860 there were three gable-ended structures of some elegance on the outer side of the single wall. We know that this is not the product of Ubsdell's imagination as the 1861 also shows three entrance ways rather than four. Common to both the Ubsdell image and the surviving evidence is the fact that the entrance ways were sunk into the surrounding level ground by about three feet.
The storage of ordnance for the bastion operated at three levels. The area under the whole bastion which was accessible from the three entrance ways noted above must have been the main permanent ammunition store as there is a secondary structure on top of the bastion with small access doors which would presumably have been the main expense magazine for the whole bastion. There are further individual expense magazines in the outer parapet adjacent to the guns.
Most of the guns were fired through embrasures in the outer parapet which were supported on either side by brickwork boxes containing compacted earth. These guns were placed on a level firing platform but the gun at the south-east corner of the bastion fired over the top of the parapet from a semi-circular racer with central pivot on a platform raised some five feet above the other guns. The parapet to this gun and the rampart beyond it were likewise elevated by about five feet.
On the north-east side of the bastion there are two batteries, one behind the other, the forward battery being set about five feet lower. At first sight this may seem excessive given that the only logical target would be the bridge over the moat that led into the town via King William's Gate. Further examination of two photographs of the lower battery from the City Museum show that the embrasures are far too narrow to accommodate the firing of even small cannon and must therefore have been for the use of small arms by the garrison. Although there are no photographs of the upper battery, the 1861 map suggests that the embrasures are probably wide enough for, say, 24 Pounders. There is a further solitary embrasure on the eastern side which allows a weapon to train on the narrow footbridge between King's Counterguard and King's Ravelin. It is noted that the chemin-des-rondes is present on the eastern side of the bastion but it terminates shortly after the moat wall turns inland, on the north-east corner, in front of the lower battery. Given the probable height of this battery, the brick wall on the outside of the chemin-des-rondes must stop at the same place. The 1861 map suggests that there is an access point from the end of the chemin-des-rondes, under the rampart and onto the lower battery; this appears in one of the photos of the lower battery but it seems that it may have been only five feet in height.
The 1861 map does not make a clear distinction between brick wall and earthen rampart at any point on the bastion, so a certain amount of guesswork has had to be employed. This can be supported to some extent by viewing the ramparts that remained after the general demolition of the fortifications around 1880. It is noted for instance that no brick walls, apart from those surrounding the semi-circular gun platform at the south-east corner of King's Bastion, have survived, but this is hardly conclusive and in any case runs counter to the knowledge of battery construction gained earlier.
All images are copyright © Tim Backhouse. Click on the thumbnails for full size versions.